msvc如何配合vcpkg使用第三方库
需要魔法?是的。
我没有魔法怎么办?请看
前置知识
- 你需要知道 msvc、vcpkg、vscode、git、cmake是什么
- 你需要知道 CPP有大量的第三方开源的工具库,如QT、Boost、fmt等
- 你需要知道如何在window11中添加环境变量
- 你需要知道什么是windows11的用户目录
- 最重要的一点,你拥有魔法。
下载 msvc build tools
打开 msvc build tools网页,找到 Tools for Visual Studio , 点击下载按钮
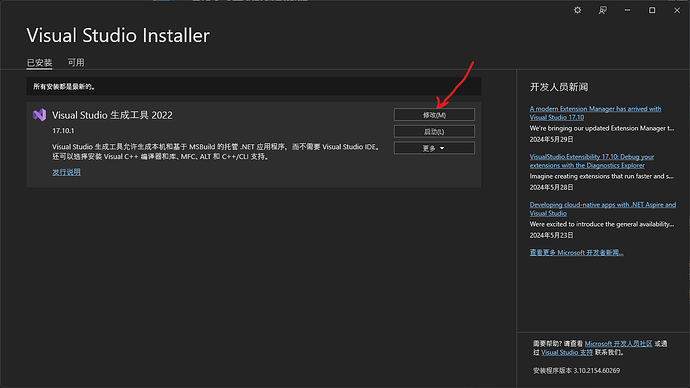
打开下载好的 Vs_BuildTools.exe,点击修改
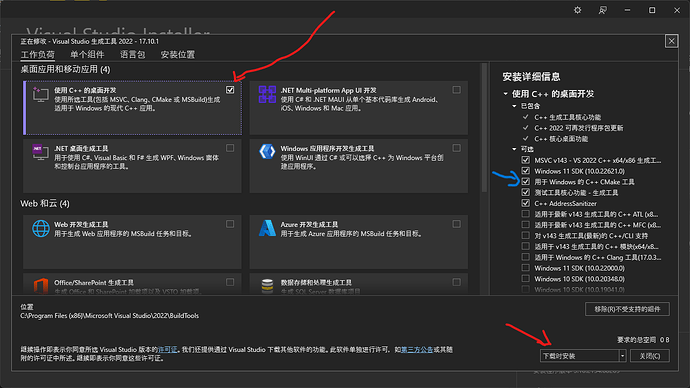
选中“使用C++的桌面开发” 以及 右边的“用于Windows 的C++ CMake工具” 并安装
再次强调! 右边的“用于Windows 的C++ CMake工具” 也要选中安装!
等待安装完成。
从 “win11开始菜单” 中点击 “所有应用” 找到 “Visual Studio 2022”,点击 “x64 Native Tools…”打开命令行。
配置vscode
下载vscode,并且将vscode的安装目录下的bin目录添加到环境变量Path中。
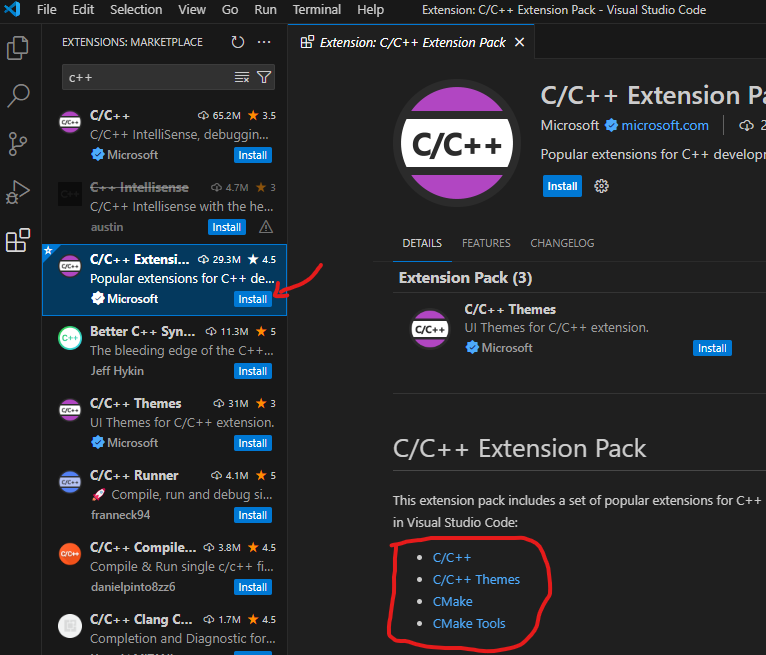
安装cpp插件集合
配置git
下载 git for windows,并将其解压到你想放置的地方,并将其cmd目录添加到环境变量中。
比如我解压到C:\Users\lll\local\minigit\目录中,我就需要在环境变量Path里添加 C:\Users\lll\local\minigit\cmd,注意,一定要包括cmd目录
配置git魔法入口,如果你的魔法支持tun模式,则不需要配置这个
在你的用户目录下创建.gitconfig文件,我的用户目录是C:\Users\lll所以我就在这个目录下创建这个文件。每个人的用户目录都不一样,根据你自己的用户路径创建。
文件内容如下:
[https]
    proxy = "http://your_proxy_server:proxy_port"
your_proxy_server是你的魔法地址,proxy_port是你的魔法端口
安装 vcpkg
开启魔法!
切换到 x64 Native Tools...命令行。
切换到你想安装vcpkg的位置,比如我想安装在C:\src\vcpkg目录下,执行以下命令
cd C:/
mkdir src
cd src
git clone https://github.com/microsoft/vcpkg.git

等待克隆完毕后
cd vcpkg
bootstrap-vcpkg.bat
vcpkg的bootstrap-vcpkg.bat会自动检测系统的魔法设置,不需要再手动设置了。执行bootstrap-vcpkg.bat后会帮我们配置好vcpkg,以后更新vcpkg也是到vcpkg安装目录下执行这个批处理脚本并执行 git pull。
设置vcpkg的环境变量
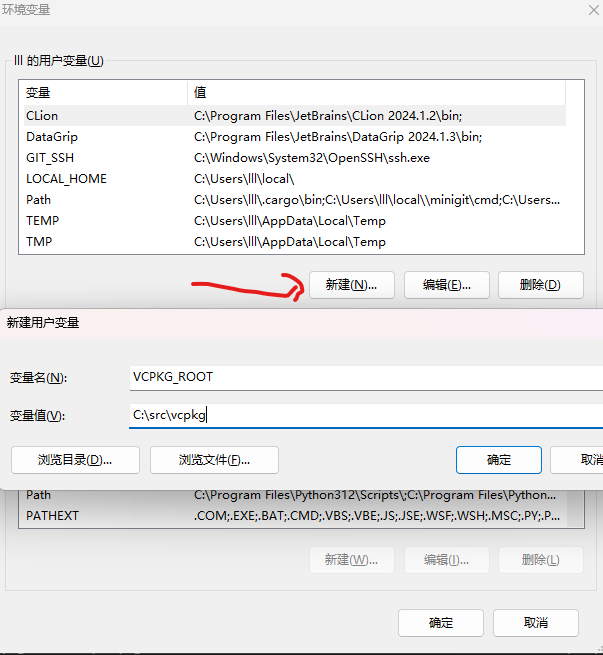
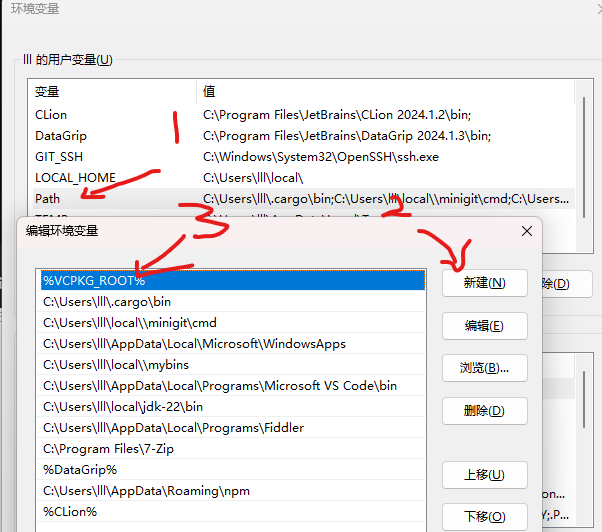
点击新建用户变量, 变量名为:“VCPKG_ROOT”,变量值为你的vcpkg安装路径。
双击 Path 变量,添加 %VCPKG_ROOT% 到你的 Path变量中。
点击确定,关闭cmd重新打开。
到这里就配置完毕了,下面试一下是否能正常运行。
hello cpp
在你喜欢的地方创建cpp项目,我创建在C:\Users\lll\sources\cpp\hellocpp里
创建下列文件
C:\Users\lll\sources\cpp\hellocpp>

├── CMakeLists.txt
├── include
│   └── hellocpp
│       └── hello.h
└── src
    ├── hellocpp
    │   └── hello.cpp
    └── main.cpp

5 directories, 4 files
CMakelists.txt
cmake_minimum_required(VERSION 3.25)
project(hellocpp)

set(CMAKE_CXX_STANDARD 17)
set(CMAKE_EXPORT_COMPILE_COMMANDS ON)

add_executable(
    ${CMAKE_PROJECT_NAME}
    src/main.cpp
    src/hellocpp/hello.cpp
)

target_include_directories(
    ${CMAKE_PROJECT_NAME}
    PUBLIC ${CMAKE_SOURCE_DIR}/include
)
src/main.cpp
#include "hellocpp/hello.h"

int main(int argc, char** argv)
{
    hellocpp::Hello hello{};
    hello.to("Linux.do");

    return 0;
}
src/hellocpp/hello.cpp
#include "hellocpp/hello.h"
#include <iostream>

void hellocpp::Hello::to(const std::string& who) {
    std::cout << "Hello " << who << " \n";
    return;
}
include/hellocpp/hello.h
#ifndef _HELLO_CPP_HELLO_H_
#define _HELLO_CPP_HELLO_H_
#include <string>
namespace hellocpp {
    class Hello{
        public:
            void to(const std::string& who);
    };
};
#endif
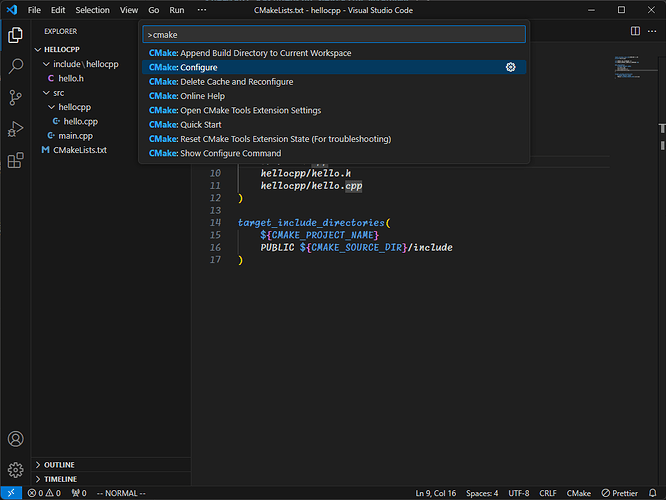
选中并打开CMakeLists.txt,按下 ctrl shift p输入 cmake,选中CMake: Configure执行cmake配置项目。
等待项目配置完成
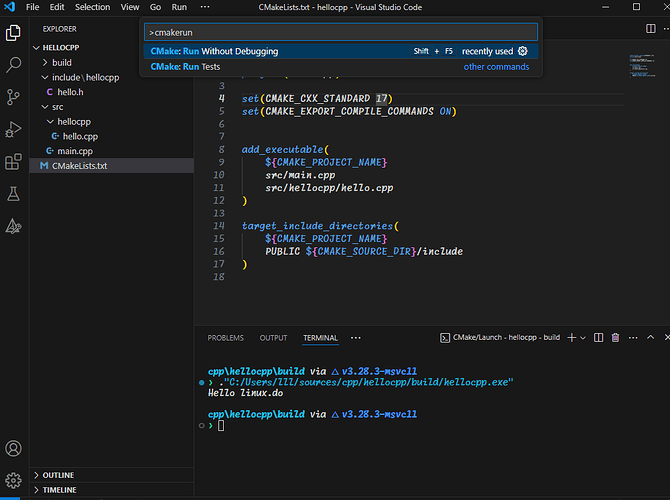
再次按下ctrl shift p输入cmake,选中CMake: run without debug运行项目。
我们没有使用第三方的库,配置如上,但是我们下了vcpkg就算冲着第三方库去的,下面来介绍一些如何使用vckpg管理第三方库。
使用vcpkg
切换到命令行,输入vcpkg new --application创建 vcpkg相关的配置文件。
然后就可以用vcpkg add port 命令安装第三方开源库了。
我这里安装 fmt 库试一下
C:\Users\lll\sources\cpp\hellocpp>vcpkg new --application

C:\Users\lll\sources\cpp\hellocpp>vcpkg add port fmt
Succeeded in adding ports to vcpkg.json file.

C:\Users\lll\sources\cpp\hellocpp>dir
 驱动器 C 中的卷没有标签。
 卷的序列号是 CA47-343F

 C:\Users\lll\sources\cpp\hellocpp 的目录

2024/xx/xx  xx:xx    <DIR>          .
2024/xx/xx  xx:xx    <DIR>          ..
2024/xx/xx  xx:xx    <DIR>          build
2024/xx/xx  xx:xx               324 CMakeLists.txt
2024/xx/xx  xx:xx    <DIR>          include
2024/xx/xx  xx:xx    <DIR>          src
2024/xx/xx  xx:xx               348 vcpkg-configuration.json
2024/xx/xx  xx:xx                38 vcpkg.json
               3 个文件            710 字节
               5 个目录 795,154,194,432 可用字节
可以看到执行上述命令后vcpkg为我们创建了 vcpkg-configuration.json 和 vcpkg.json 这两个文件。
我们还需要创建一个CMakePresets.json文件来告诉cmake我们使用了vcpkg工具链
内容如下:
{
    "version": 6,
    "configurePresets": [
        {
            "name": "default",
            "generator": "Ninja",
            "binaryDir": "${sourceDir}/build/${presetName}",
            "cacheVariables": {
                "CMAKE_TOOLCHAIN_FILE": "$env{VCPKG_ROOT}/scripts/buildsystems/vcpkg.cmake",
                "CMAKE_INSTALL_PREFIX": "${sourceDir}/out/install/${presetName}"
            }
        },
        {
          "name": "debug",
          "inherits":["default"],
          "cacheVariables": {
            "CMAKE_BUILD_TYPE": "Debug"
          }
        },
        {
          "name": "release",
          "inherits":["default"],
          "cacheVariables": {
            "CMAKE_BUILD_TYPE": "Release"
          }
        }
    ]
}
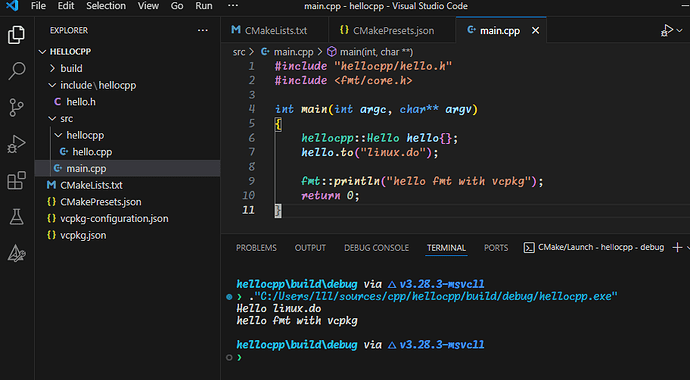
修改 src/main.cpp
#include "hellocpp/hello.h"
#include <fmt/core.h>

int main(int argc, char** argv)
{
    hellocpp::Hello hello{};
    hello.to("linux.do");

    fmt::println("hello fmt with vcpkg");
    return 0;
}
修改 CMakelists.txt
cmake_minimum_required(VERSION 3.25)
project(hellocpp)

set(CMAKE_CXX_STANDARD 17)
set(CMAKE_EXPORT_COMPILE_COMMANDS ON)

find_package(fmt CONFIG REQUIRED)

add_executable(
    ${CMAKE_PROJECT_NAME}
    src/main.cpp
    src/hellocpp/hello.cpp
)

target_include_directories(
    ${CMAKE_PROJECT_NAME}
    PUBLIC ${CMAKE_SOURCE_DIR}/include
)

target_link_libraries(
    ${CMAKE_PROJECT_NAME}
    PRIVATE fmt::fmt
)
由于我们对配置文件做了修改,保险起见需要先删除了我们上一次编译出来的目录
或者 ctrl shift p 输入 cmake 选中 cmake: clean运行
因为第一次没有配置json文件就编译过了,所以这个命令可能会执行失败,所以推荐第一次最好是手动删除build目录。
或者你配置好json文件后再执行第一次编译。
# 删除上次的编译目录
C:\Users\lll\sources\cpp\hellocpp>del build
C:\Users\lll\sources\cpp\hellocpp\build\*, 是否确认(Y/N)? ydel build

# 关闭vscode重新打开
C:\Users\lll\sources\cpp\hellocpp>code .
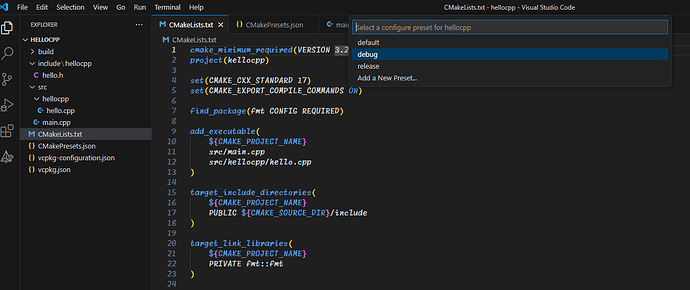
输入ctrl shift p 输入 cmake 选中 cmake: configure, 在弹出的框中选中debug或者release
这样vcpkg就会接管cmake,自动下载编译第三方库
按下ctrl shif p 输入 cmake 选中 cmake: run without debugging
其他第三方库也是一样的用法。
总结
- 创建 cpp 项目目录
- 执行 vcpkg new --application初始化目录
- 执行 vcpkg add port 包名 添加第三方包
- 创建 CMakelists.txt 以及 CMakePresets.json文件写好配置
- 写代码
- ctrl shift p 输入 cmake 选中 cmake: configure,再选中你配置好的preset,这个过程中vcpkg会下载第三方库
- ctrl shift p 输入 cmake 选中 cmake: run without debugging 运行你的项目,这个过程中vcpkg会让cmake自动编译第三方库
后话
学习C++是一件很折腾的事情,我们C++佬在折腾中成长,在成长中收获快乐。所以你如果很懒又想很快乐,请看看Python。
学习 cmake 并掌握 cmake的用法,能让你在c++的世界里事半功倍,在看完本教程后推荐继续去看vcpkg的文档和cmake的文档,重点了解cmake的presets 和 vcpkg的基础用法以及他的经典模式和清单模式,本教程使用的是清单模式。
推荐项目/网站(有些需要魔法才能访问):
- vcpkg
- cmake preset
- c++ 文档
- c++ 之父
- cppstories
- cpp core guidelines
- awesome cpp
- moder cpp programming
- 羽化飞升经
搞七捻三:
