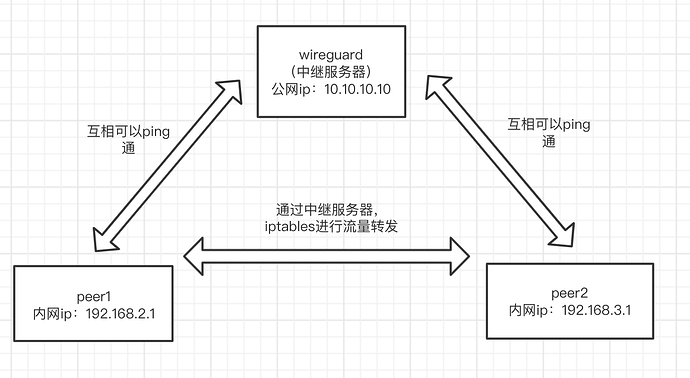
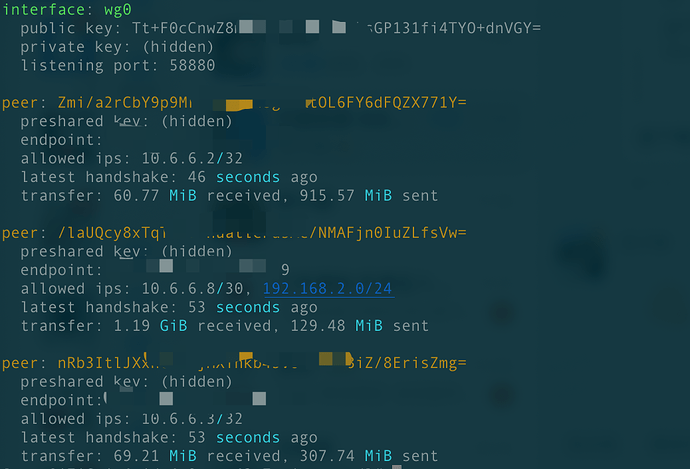
简介:自己想建立一个,稳定,安全的组网环境,之前有用zerotier,并且自己搭建了moon,但有时候也会存在链接不上情况,毕竟服务器是是他们三方搭建的,而且在国外,安全和稳定性都不靠谱,所以只有自己搭建一套组网环境,才是最可靠的
什么是wireguard
WireGuard® is an extremely simple yet fast and modern VPN that utilizes state-of-the-art cryptography. It aims to be faster, simpler, leaner, and more useful than IPsec, while avoiding the massive headache. It intends to be considerably more performant than OpenVPN. WireGuard is designed as a general purpose VPN for running on embedded interfaces and super computers alike, fit for many different circumstances. Initially released for the Linux kernel, it is now cross-platform (Windows, macOS, BSD, iOS, Android) and widely deployable. It is currently under heavy development, but already it might be regarded as the most secure, easiest to use, and simplest VPN solution in the industry.
翻译:WireGuard是一款极其简单但快速的现代VPN,它利用了最先进的加密技术。它的目标是比IPsec更快、更简单、更精简、更有用,同时避免巨大的头痛。它打算比OpenVPN有更高的性能。WireGuard是一种通用VPN,可在嵌入式接口和超级计算机上运行,适用于多种不同的环境。它最初是为Linux内核发布的,现在是跨平台的(Windows、macOS、BSD、iOS、Android),并且可以广泛部署。它目前正在大力开发中,但已经被认为是业界最安全、最易使用、最简单的VPN解决方案
这是官方的解释,可以看出WireGuard具备以下几个特征
- 自组网,服务可控
- 安全,
- 快速,
- 平台兼容性好
还有一点:Linux 创造者 Linus Torvalds 非常喜欢 WireGuard,以至于将其合并到 Linux Kernel 5.6 中。
WireGuard穿透预期效果图
wireguard搭建完成后,中继服务器与各个peer之间是可以互通,但是peer之间是放问不了的
需要通过中继服务器,开发iptables流量转发来实现peer之间的互通
开始搭建wireguard
这里简单介绍下centos7中如何安装wireguard
sudo yum install epel-release elrepo-release
sudo yum install yum-plugin-elrepo
sudo yum install kmod-wireguard wireguard-tools
其他平台,例如:安卓,mac,下载对应app就可以了
中继服务器搭建
1.生成服务器端密钥
cd /etc/wireguard/
umask 077
wg genkey | tee server_private_key | wg pubkey > server_public_key
生成完成后,就可以看到当前路径下有“server_private_key”及“server_public_key”2个文件。
2.创建服务器配置文件
在/etc/wireguard/下创建wg0.conf文件。
vi /etc/wireguard/wg0.conf
文件内容为:
[Interface]
Address = 10.0.0.1/24
SaveConfig = true
PrivateKey = 服务器的私钥(在服务器上生成的server_private_key文件)
ListenPort = 51820
peer1客户端搭建:
客户创建密匙和服务端一样,这里只贴出来,配置文件的内容
[Interface]
Address = 10.0.0.2/32
PrivateKey = 客户端的私钥
DNS = 10.0.0.1

[Peer]
PublicKey = 服务器的公钥
Endpoint = 服务器的物理ip地址:51820
AllowedIPs = 0.0.0.0/0
PersistentKeepalive = 25
peer2客户端搭建:
客户创建密匙和服务端一样,这里只贴出来,配置文件的内容
[Interface]
Address = 10.0.0.3/32
PrivateKey = 客户端的私钥
DNS = 10.0.0.1

[Peer]
PublicKey = 服务器的公钥
Endpoint = 服务器的物理ip地址:51820
AllowedIPs = 0.0.0.0/0
PersistentKeepalive = 25
gateway 添加 peer
cd /etc/wireguard
vim wg0.conf
最下边添加
[Peer]
PublicKey = ${peer1中的PUBLICKEY}
AllowedIPs = 10.6.6.2/32

[Peer]
PublicKey = ${peer2中的PUBLICKE}
AllowedIPs = 10.6.6.3/32
添加流量转发
cd /etc/wireguard
vim wg0.conf
PostUp = iptables -A FORWARD -i %i -j ACCEPT; iptables -A FORWARD -o %i -j ACCEPT; iptables -t nat -A POSTROUTING -o wg0 -j MASQUERADE
PostDown = iptables -D FORWARD -i %i -j ACCEPT; iptables -D FORWARD -o %i -j ACCEPT; iptables -t nat -D POSTROUTING -o wg0 -j MASQUERADE
链接测试
到这里,各个节点已经实现互通


