受限于工作机 Windows 7 和上古的 1050Ti 显卡连 PS 2023 的生成式填充都没体验过,各种 AI 放大软件要么直接要求 Windows 10 要么一张图卡半小时,直到接触 GCP 后终于圆我执念。
原图:
PS 直接调 400%:

Google Imagne 4 倍放大:

免费用户之前需要先填申请:图片生成和修改 | Generative AI on Vertex AI | Google Cloud 绑卡用户不知道。就直接填个人试用就行审核时间 2 天左右,控制台自带了「文生图」和「修改图片遮罩部分」就是跟 PS 2023 的生成式填充那样。但我没找到图片放大在哪,所以单独写个接口本地用。
云端用的 updownup 大佬那个 Claude 3.5 的 Worker 改的:
const PROJECT_ID = '…';
const CLIENT_ID = '…';
const CLIENT_SECRET = '…';
const REFRESH_TOKEN = '…';
const TOKEN_URL = 'https://www.googleapis.com/oauth2/v4/token';
const API_KEY = '…';
//  省略号部分填自己的,前置工作参考 [6.26修复空值BUG][全功能+Cloudflare Workers+… 那帖子。

let tokenCache = {
  accessToken: '',
  expiry: 0,
  refreshPromise: null
};

async function getAccessToken() {
  const now = Date.now() / 1000;

  if (tokenCache.accessToken && now < tokenCache.expiry - 120) {
    return tokenCache.accessToken;
  }

  if (tokenCache.refreshPromise) {
    await tokenCache.refreshPromise;
    return tokenCache.accessToken;
  }

  tokenCache.refreshPromise = (async () => {
    try {
      const response = await fetch(TOKEN_URL, {
        method: 'POST',
        headers: {
          'Content-Type': 'application/json'
        },
        body: JSON.stringify({
          client_id: CLIENT_ID,
          client_secret: CLIENT_SECRET,
          refresh_token: REFRESH_TOKEN,
          grant_type: 'refresh_token'
        })
      });

      const data = await response.json();
      tokenCache.accessToken = data.access_token;
      tokenCache.expiry = now + data.expires_in;
    } finally {
      tokenCache.refreshPromise = null;
    }
  })();

  await tokenCache.refreshPromise;
  return tokenCache.accessToken;
}

function getLocation() {
  let region;
  const currentSecond = new Date().getSeconds();

  switch (Math.floor(currentSecond / 10)) {
    case 0:
      region = 'us-central1';
      break;
    case 1:
      region = 'us-west1';
      break;
    case 2:
      region = 'us-west4';
      break;
    case 3:
      region = 'europe-west1';
      break;
    case 4:
      region = 'europe-west2';
      break;
    case 5:
      region = 'europe-west3';
      break;
    default:
      region = 'us-central1';
  }

  return region;
}

// 构建 API URL (固定为 imagegeneration@002)
function constructApiUrl(location) {
  return `https://${location}-aiplatform.googleapis.com/v1/projects/${PROJECT_ID}/locations/${location}/publishers/google/models/imagegeneration@002:predict`;
}

async function handleRequest(request) {
  if (request.method === 'OPTIONS') {
    return handleOptions();
  }

  const apiKey = request.headers.get('x-api-key');
  if (apiKey !== API_KEY) {
    return new Response(JSON.stringify({ error: 'Invalid API key' }), { status: 403 });
  }

  try {
    const accessToken = await getAccessToken();
    const location = getLocation();
    const apiUrl = constructApiUrl(location);

    const requestBody = await request.json();

    //  删除 gcsUri
    delete requestBody.instances[0].image.gcsUri;

    const response = await fetch(apiUrl, {
      method: 'POST',
      headers: {
        'Content-Type': 'application/json',
        'Authorization': `Bearer ${accessToken}`,
      },
      body: JSON.stringify(requestBody),
    });

    if (!response.ok) {
      const errorData = await response.json();
      throw new Error(`API request failed: ${errorData.error.message}`);
    }

    const responseData = await response.json();
    return new Response(JSON.stringify(responseData), {
      headers: {
        'Content-Type': 'application/json',
        'Access-Control-Allow-Origin': '*',
        'Access-Control-Allow-Methods': 'POST, GET, OPTIONS',
        'Access-Control-Allow-Headers': 'Content-Type, Authorization, x-api-key',
      },
    });
  } catch (error) {
    return new Response(JSON.stringify({ error: error.message }), { status: 500 });
  }
}

function handleOptions() {
  return new Response(null, {
    status: 204,
    headers: {
      'Access-Control-Allow-Origin': '*',
      'Access-Control-Allow-Methods': 'POST, GET, OPTIONS',
      'Access-Control-Allow-Headers': 'Content-Type, Authorization, x-api-key',
    },
  });
}

addEventListener('fetch', (event) => {
  event.respondWith(handleRequest(event.request));
});
和部署 Claude 3.5 那帖一样放到 Cloudflare Worker 就行。
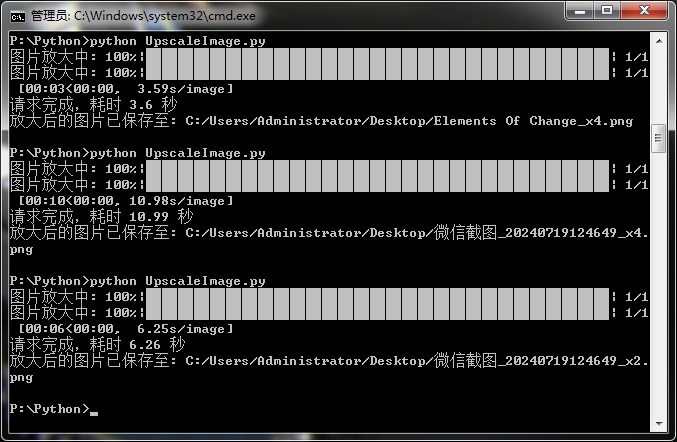
本地我是用 Python 发送请求:执行 py → 选择图片 → 返回结果到相同目录,供参考。
import base64
import time
import tkinter as tk
from tkinter import filedialog
import requests
from tqdm import tqdm  # 进度条好像没用,但我懒得处理了不影响。

# 缺失库的话直接先执行一下 py,然后把报错丢到 ChatGPT 然后复制返回的命令安装就行。

# 预设参数
API_KEY = "…"  # 填 Cloudflare Worker 里自己设的那个 Key
WORKER_URL = "…" # Worker 的地址,不记得的话点开你项目 → 设置 → 触发器 → 第二排「路由」那里
UPSCALE_FACTOR = "x4" # 目前只支持 x2、x4 这俩参数


def select_image():
    root = tk.Tk()
    root.withdraw()  # 隐藏主窗口
    file_path = filedialog.askopenfilename(
        title="选择图片", filetypes=(("Image files", "*.jpg *.jpeg *.png *.bmp"), ("All files", "*.*"))
    )
    return file_path


def upscale_image(image_path):
    with open(image_path, "rb") as image_file:
        base64_image = base64.b64encode(image_file.read()).decode("utf-8")

    headers = {
        "x-api-key": API_KEY,
        "Content-Type": "application/json",
    }

    data = {
        "instances": [{"image": {"bytesBase64Encoded": base64_image}}],
        "parameters": {
            "sampleCount": 1,
            "mode": "upscale",
            "upscaleConfig": {"upscaleFactor": UPSCALE_FACTOR},
        },
    }

    start_time = time.time()
    with tqdm(total=1, desc="图片放大中", unit="image") as pbar:
        response = requests.post(WORKER_URL, headers=headers, json=data)
        pbar.update(1)

    end_time = time.time()
    elapsed_time = round(end_time - start_time, 2)
    print(f"请求完成,耗时 {elapsed_time} 秒")

    if response.status_code == 200:
        try:
            response_data = response.json()
            upscaled_image_base64 = response_data["predictions"][0][
                "bytesBase64Encoded"
            ]
            upscaled_image_data = base64.b64decode(upscaled_image_base64)

            # 保存放大后的图片
            image_name, image_ext = image_path.rsplit(".", 1)
            output_path = f"{image_name}_{UPSCALE_FACTOR}.{image_ext}"
            with open(output_path, "wb") as output_file:
                output_file.write(upscaled_image_data)

            print(f"放大后的图片已保存至: {output_path}")
        except Exception as e:
            print(f"处理响应数据时出错: {e}")
            print(f"响应内容: {response.text}")
    else:
        print(f"请求失败,状态码: {response.status_code}")
        print(f"响应内容: {response.text}")


if __name__ == "__main__":
    image_path = select_image()
    if image_path:
        upscale_image(image_path)
当然你用网页端处理也行,核心只有那段 Curl。
处理一张图一般几秒~十几秒。网上同类型 AI 放大网站很多,但一般都是要排队等到猴年马月。
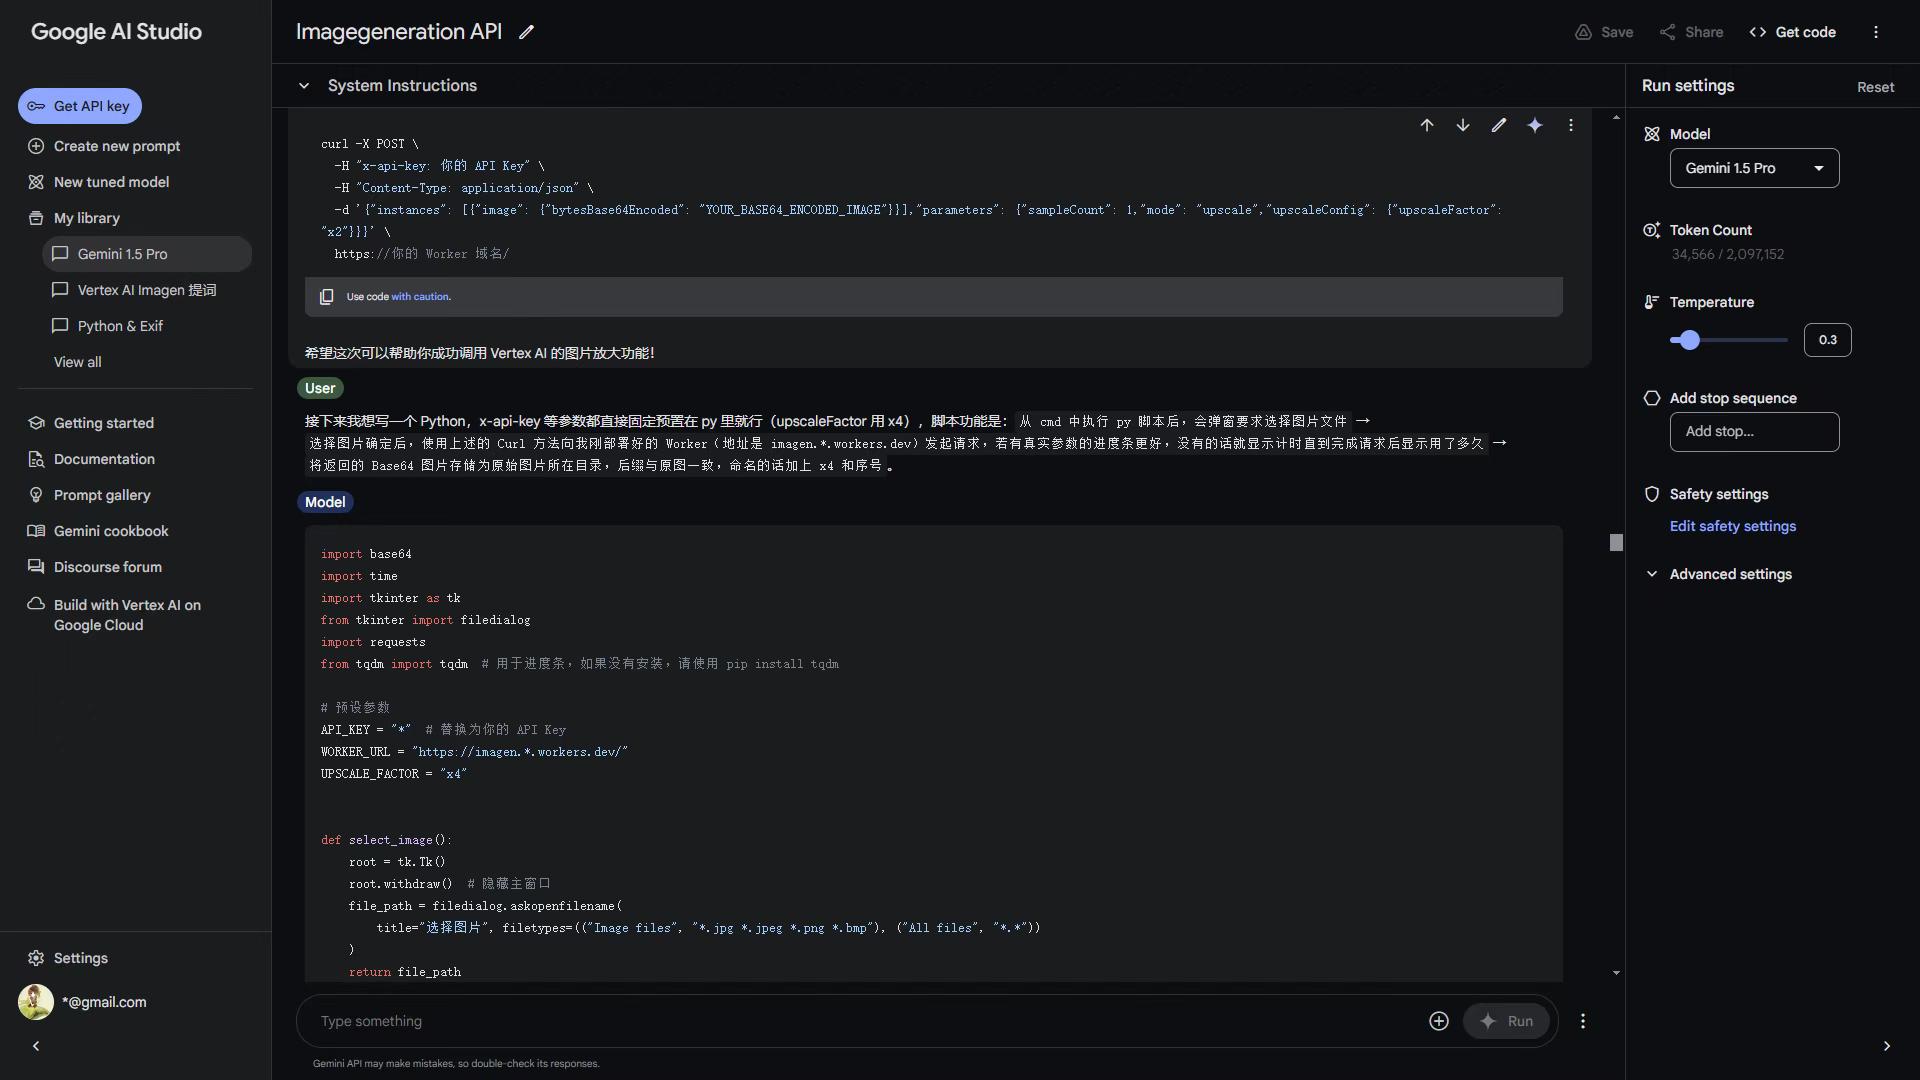
另外我完全不懂 Python 和 Node.js 代码都是让 Google AI Studio 写的 Google AI 스튜디오 | Gemini API | 개발자를 위한 Google | Google AI for Developers 网页版免费,生成代码的体验上我感觉比 ChatGPT 还好。
总而言之就是这样。第一次发代码贴不知道代码块可不可以自动折叠不然帖子排版很长。