(PS:本质还是 始皇 的教程,我只是将各个内容结合了一下行个方便。)
零,项目介绍
本项目主要使用自己拥有模型的API,替代官方API以使用代码chat和补全的,认证使用cocopilot (LinuxDO论坛账户) 不存在封号风险。
要求补全模型必须是gpt-35-turbo-instruct,或者根据Copilot新配置,可将补全模型替换为原版的Github Copilot(前提要有订阅),实测速度的确比之前的更快。
该项目对chat模型无要求。
我的配置config.json如下
//代码补全模型配置,默认模型gpt35turbo-instruct且无法修改
//如果使用Cocopilot则无需配置此选项
  "codex_api_base": "https://oai.itsfurry.com/v1",
  "codex_api_key": "sk-***",
  "codex_api_organization": "",
  "codex_api_project": "",
  "codex_max_tokens": 4093,
//聊天模型,无要求,国产海外都可以
  "chat_api_base": "https://api.deepseek.com/v1",
  "chat_api_key": "sk-***",
  "chat_api_organization": "",
  "chat_api_project": "",
  "chat_model_default": "deepseek-coder",
  "chat_model_map": {}
DeepSeek 便宜量大,注册就送API。
OAI.ITSFURRY 论坛其他成员搭建API服务,签到送,论坛帖子地址:(bug修复)论坛用户专享Api上线签到功能,算公测阶段 - 常规话题 / 人工智能 - LINUX DO
一,项目地址
Github项目地址:
源项目链接:Copilot开车平台
项目讨论地址:Linux Do论坛
二,搭载教程(二选一)
1,Docker部署(服务器搭建)
下载代码,并传到服务器中
unzip override-master.zip
cd ./override-master
docker-compose build override-app
等待linux-do/override:latest的docker构建
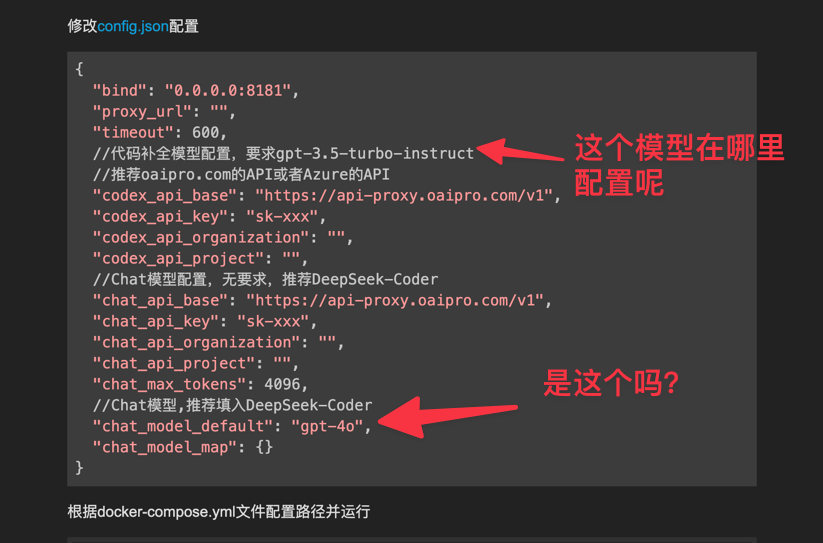
修改config.json配置
{
  "bind": "0.0.0.0:8181",
  "proxy_url": "",
  "timeout": 600,
  //代码补全模型配置,要求gpt-3.5-turbo-instruct
  //推荐oaipro.com的API或者Azure的API
  //如果使用Cocopilot则无需配置
  "codex_api_base": "https://api-proxy.oaipro.com/v1",
  "codex_api_key": "sk-xxx",
  "codex_api_organization": "",
  "codex_api_project": "",
  //Chat模型配置,无要求,推荐DeepSeek-Coder
  "chat_api_base": "https://api-proxy.oaipro.com/v1",
  "chat_api_key": "sk-xxx",
  "chat_api_organization": "",
  "chat_api_project": "",
  "chat_max_tokens": 4096,
  //Chat模型,推荐填入DeepSeek-Coder
  "chat_model_default": "gpt-4o",
  "chat_model_map": {}
}
根据docker-compose.yml文件配置路径并运行
2,对应系统平台部署(个人平台搭建)
根据不同系统,在仓库地址下载对应的软件包
修改config.json配置
{
  "bind": "127.0.0.1:8181",
  "proxy_url": "",
  "timeout": 600,
  //代码补全模型配置,要求gpt-3.5-turbo-instruct
  //推荐oaipro.com的API或者Azure的API
  "codex_api_base": "https://api-proxy.oaipro.com/v1",
  "codex_api_key": "sk-xxx",
  "codex_api_organization": "",
  "codex_api_project": "",
  //Chat模型配置,无要求,推荐DeepSeek-Coder
  "chat_api_base": "https://api-proxy.oaipro.com/v1",
  "chat_api_key": "sk-xxx",
  "chat_api_organization": "",
  "chat_api_project": "",
  "chat_max_tokens": 4096,
  //Chat模型,推荐填入DeepSeek-Coder
  "chat_model_default": "gpt-4o",
  "chat_model_map": {}
}
点击软件启动(Windows下为exe文件,访问127.0.0.1:8181有显示即可)
三,Cocopilot(可选)
0,解释
若已经有gpt-3.5-turbo-instruct模型作为代码补全模型,且能正常使用可忽略。
Cocopilot本质为多人共享一个Github Copilot权限,且通过服务器中转让GIthub认为只有你一人在使用,从而降低了多人共用被Github识别封锁账户Copilot权限。
此教程为在Github上拥有Github Copilot权限的人将其权限分享出来,若没有权限则直接查看(4,上车(无Github订阅))。
1,前提条件
前提:在Github上拥有Github Copilot权限

2,开一辆新车
(1)获取ghu_token
在Cocopilot中获取token,进入Dashboard 或者NewCar填入上述获得的Token
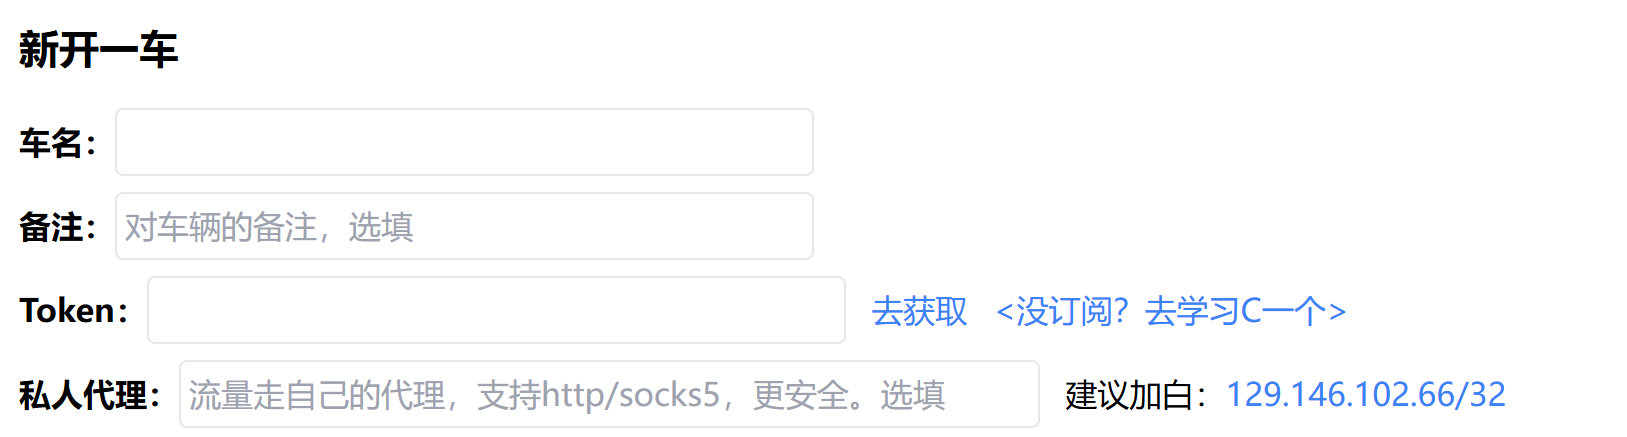
(2)添加用户
在Dashboard查看用户ID:4****************5,填入成员0~9中
(3)更改选项

建议设置
3,私人代理(可选,推荐)
代理的本质是将客户端的请求先中转到自有服务端中,再由此发往Github Copilot服务器,其目的是使Github服务端检测到仅有一个IP(自有服务器)使用此服务请求,进而降低了多个IP同时请求Github Copilot服务器造成Github认为你多人共用从而封锁账户Copilot权限的风险。
如若不部署此代理,会用始皇的服务器IP自行代理。
(1)个人服务器搭建SOCKS5
填入私人代理格式:socks5://user:[email protected]:port
(2)安装 tinyproxy 配置
安装命令(Ubuntu)
#!/bin/bash

sudo apt update
sudo apt install -y tinyproxy

FILE="/etc/tinyproxy/tinyproxy.conf"
ENTRY="Allow 129.146.102.66/32"

if grep -q "$ENTRY" "$FILE"; then
    echo "Entry already exists in $FILE"
else
	echo "$ENTRY" | sudo tee -a "$FILE" > /dev/null
    echo "Entry added to $FILE"
fi

sudo sed -i "s/#DisableViaHeader Yes/DisableViaHeader Yes/g" "$FILE"

sudo chown -R tinyproxy:tinyproxy /var/log/tinyproxy

sudo systemctl restart tinyproxy
脚本作用是安装 tinyproxy 配置 ip 白名单然后启动。
配置后放行8888端口。
填入私人代理格式:http://ip:port
4,上车(无Github订阅)
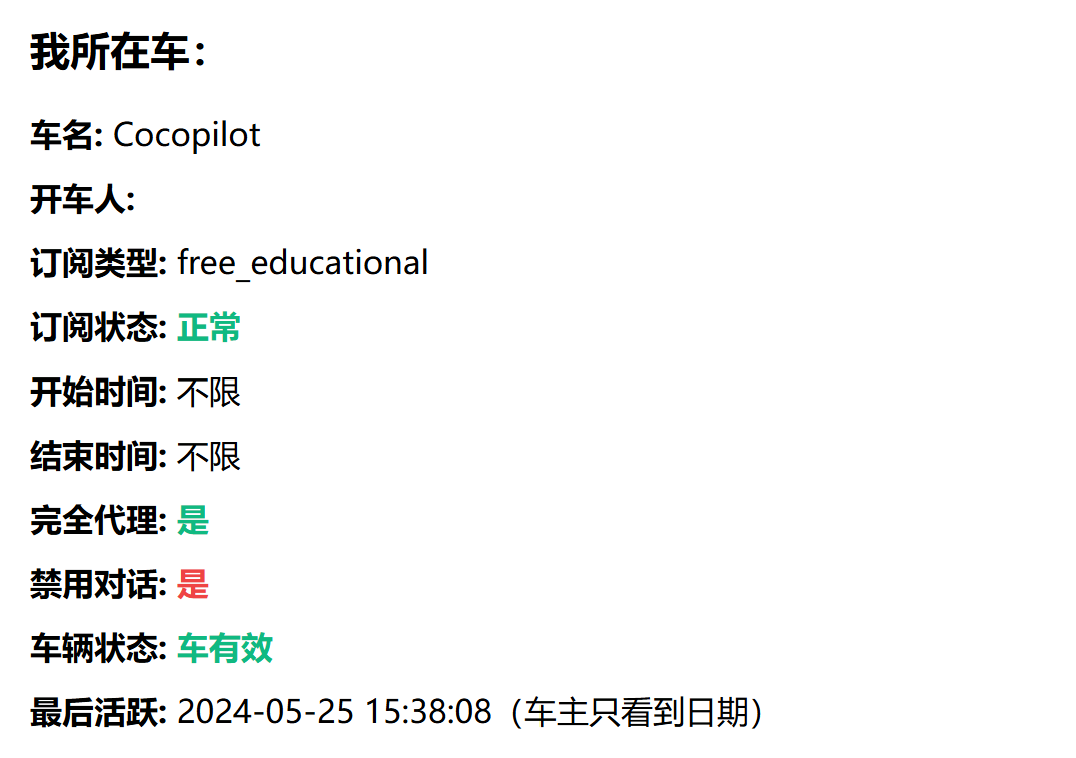
在Dashboard查看用户ID:**4****************5,让别人将你的用户ID填入上述的成员0~9中,此时进入Cocopilot会看见如下信息,则表明你能够使用Cocopilot。
四,使用教程:
1,前提条件
LinuxDo论坛账户:用于过认证
2,VSCode配置
- 下载Github Copilot插件
- 右键插件 → 扩展设置 → 在settings.json中编辑
- 代码粘贴如仓库所示。
    "github.copilot.advanced": {
        //代码补全使用自有模型配置
        "debug.overrideProxyUrl": "http://127.0.0.1:8181",
        //代码补全使用Github Copilot模型配置
        "debug.overrideProxyUrl": "https://cocopilot.org",

        "debug.chatOverrideProxyUrl": "<http://127.0.0.1:8181/v1/chat/completions>",
        "authProvider": "github-enterprise"
    },
    "github-enterprise.uri": "<https://cocopilot.org>",
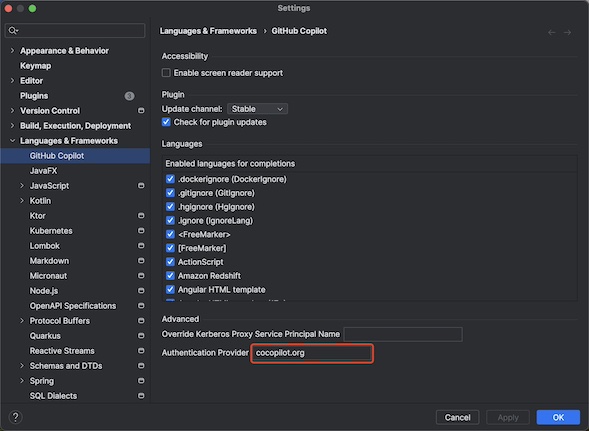
3,JetBrains系列软件配置
- 下载支持Github Copilot版本的JetBrains软件
在 Settings → Languages & Frameworks → GitHub Copilot → Authentication Provider: 填入cocopilot.org执行对应系统脚本后重启IDE
scripts/install.sh 适用于 macOS 和 Linux
scripts/install-all-users.vbs 适用于 Windows,为电脑上所有用户配置,需要有管理员权限。
scripts/install-current-user.vbs 适用于 Windows,为当前用户配置,无需管理员权限。
scripts/uninstall 相关脚本与之对应,为卸载配置。
2.在ja-netfilter/plugin-env下载发行版本,放入 plugins-jetbrains 文件夹。然后在 config-jetbrains 目录新建 env.conf 文件。
以下是一个替代 CoCopilot 脚本的 env.conf 配置:
[ENV]
PREFIX,AGENT_DEBUG_OVERRIDE_CAPI_URL=https://cocopilot.org
PREFIX,AGENT_DEBUG_OVERRIDE_PROXY_URL=https://cocopilot.org
PREFIX,GITHUB_COPILOT_OVERRIDE_CAPI_URL=https://cocopilot.org
PREFIX,GITHUB_COPILOT_OVERRIDE_PROXY_URL=https://cocopilot.org
图片来源:Cocopilot
五,部署成功日志(以VSCode为例)
1,Github Copilot Chat 日志
2024-05-18T15:52:14.332Z [INFO] [chat] copilot token chat_enabled: true
2024-05-18T15:52:14.332Z [INFO] [auth] Got Copilot token for user
2024-05-18T16:06:02.704Z [INFO] [chat fetch] engine <http://127.0.0.1:8181/v1/chat>
2024-05-18T16:06:02.704Z [INFO] [chat fetch] modelMaxTokenWindow 4096
2024-05-18T16:06:02.704Z [INFO] [chat fetch] chat model gpt-4
2024-05-18T16:06:05.355Z [INFO] [chat fetch] request.response: [<http://127.0.0.1:8181/v1/chat/completions>], took 2650 ms
2024-05-18T16:06:09.964Z [INFO] [streamMessages] message 0 returned. finish reason: [stop]
2024-05-18T16:06:09.966Z [INFO] [streamChoices] request done: headerRequestId: [] model deployment ID: []
2024-05-18T16:06:11.435Z [INFO] [chat fetch] engine <http://127.0.0.1:8181/v1/chat>
2024-05-18T16:06:11.435Z [INFO] [chat fetch] modelMaxTokenWindow 8192
2024-05-18T16:06:11.435Z [INFO] [chat fetch] chat model gpt-3.5
2024-05-18T16:06:11.772Z [INFO] [chat fetch] request.response: [<http://127.0.0.1:8181/v1/chat/completions>], took 337 ms
2024-05-18T16:06:11.773Z [INFO] [chat fetch] Request ID for failed request: ,8246bc12-f2bc-4185-8282-76632f2a6df2
2,Github Copilot 日志(自有模型)
2024-05-19 00:13:09.943 [info] [fetcher] Using Helix fetcher, Electron fetcher is not available.
2024-05-19 00:13:09.943 [info] [code-referencing] Public code references are enabled.
2024-05-19 00:13:09.944 [info] [auth] Sucessfully authenticated
2024-05-19 00:13:32.823 [info] [fetchCompletions] request.response: [<http://127.0.0.1:8181/v1/engines/copilot-codex/completions>] took 3015 ms
2024-05-19 00:13:32.826 [info] [streamChoices] solution 0 returned. finish reason: [stop]
2024-05-19 00:13:32.827 [info] [streamChoices] request done: headerRequestId: [] model deployment ID: []
3,Github Copilot 日志(Copilot配置车)
2024-05-21 22:07:29.149 [info] [streamChoices] solution 0 returned. finish reason: [stop]
2024-05-21 22:07:29.153 [info] [streamChoices] request done: headerRequestId: [] model deployment ID: []
2024-05-21 22:07:30.869 [info] [code-referencing] Calling Match
2024-05-21 22:23:09.872 [info] [fetcher] Using Helix fetcher, Electron fetcher is not available.
2024-05-21 22:23:09.872 [info] [code-referencing] Public code references are enabled.
2024-05-21 22:07:04.967 [info] [streamChoices] solution 0 returned. finish reason: [stop]
2024-05-21 22:07:04.976 [info] [streamChoices] request done: headerRequestId: [] model deployment ID: []
2024-05-21 22:07:14.563 [info] [fetchCompletions] request.response: [<https://cocopilot.org/v1/engines/copilot-codex/completions>] took 2424 ms
查看copilot插件的日志,与上述进行对比。
注意路径问题,如果路径不对可以在插件中修改。
上述为本地部署,若是服务器部署对应的 127.0.0.1:8181 为域名地址